Monday, 3 December 2012

Easy Advent Calendar

I have just hung up our home made advent calendar - yes, a few days late but that just means a whole bundle of goodies to start with!

This is so simple, re-usable and the best part is, you can fill it with anything you like - sweets, stickers, pencils, games, whatever you're happy for your little ones to have.


All you will need is envelopes, numbers (stickers, stamps - whatever you have to hand), string / twine for hanging, pegs and the goodies.  


The countdown to Christmas has begun!

Wednesday, 28 November 2012

Christmas Reindeer Bunting

This Christmas, I'm making reindeer bunting for sale in my on-line shop and at Christmas fairs.  I wanted to have something quick, simple and Christmassy to make alongside my regular stuff plus I also really wanted to try fabric printing and so decided to combine the two.

So, here's what I did....


Carve my own stamp.  Carve my own stamp! Hang on, this is getting complicated!  The kit arrived, I drew my shape onto the rubber and got out my gouging tool - oooooh.

To be honest, I thought this would go horribly, horribly wrong.  But, I was extra careful and managed to carve a pretty good stamp for my first time.


After a little cleaning up, I just got busy stampin'


 Added a little felt holly and red button berries 


And we're done.  


If you would like some - just click here.

I am now obsessed with stamping...watch this space!


Friday, 28 September 2012

Learning Curve

So yesterday afternoon, I spent a few hours snapping my products to update the website and new etsy shop and during those hours, I learnt a few things, such as:

1. It would be really useful if I could keep my home moderately clean most of the time.  I wouldn't waste so much time trying to find stuff or doing extra cleaning just so I can take a picture.

2. The ipad is great.

3. It is a good "investment" to buy nice things so I can use them for props.  Honest Mr L, we really need them...(not sure what yet, but when I see the essential piece of furniture or picture, I'll be ready and waiting with this line)

4. I  have just been taking photos in quite a dark room, trying to avoid the direct sunlight and the shadows - turns out, things went pretty well.  Lesson was "give it a go, you never know".

5. The ipad is great, did I mention that already?


I'm also feeling quite pleased with myself as this week I have made some major accomplishments...I have hemmed the curtains that have hung in our window for nearly 4 years, I have also hemmed a dress and hung a picture on the wall within a month of it's arrival.  Like I said, MAJOR accomplishments.

My next challenge is to make a curtain for the dining room window in some Liberty fabric that arrived this morning from Backstitch...


And yes, that is a dress pattern.  I wonder how long it's going to take me to even open the packet and take a look....


Tuesday, 25 September 2012

How to sew a Zip Tutorial


I may have mentioned that I'm not a super-experienced sewer...for ages I was wondering how to sew a zip without all the seams showing.  Surely anything that needs a separate foot must just be really difficult, right?  Wrong!  Sewing a zip is SOOOOO easy!

Here is a little tutorial for a simple little purse, useful for coins, cards, keys, anything!  And the best part is, once you've done it once, the zipped world is your oyster.

You will need:


2 x outer fabric
2 x lining fabric
2 x fusible interfacing
1 x zip

Tools - zipper foot, your sewing box.

1/2" seam allowance

You can make this to any size as long as your zip fits, mine is 6.5" x 4" and I use a 7" closed end zip.

1.  Cut all your fabric and interfacing pieces to the same size and iron your fusible interfacing onto the wrong side of your outer fabric.

2. Now, we need to make a zip sandwich.

Take 1 of your outer fabrics and lay right side up and place your zipper wrong side down across the top, like so:


Take 1 of your lining pieces and place right side down on top of the zip, pin to keep everything in place.


3.  Attach your zipper foot - now this is where I always got confused, which side do you attach!  You want your foot to nudge right up to the zip so you can sew close to your zip.  You can see in this photo, my foot is attached on the left side to get a nice close stitch.


You will need to undo your zip a little, sew down a few inches and then (with your needle down) do your zip up again as it won't have room to pass under your foot.  Backstitch at both ends to secure.

Once sewn, fold over your lining so that the wrong sides are together.  Press away from the zip.


That's your first side all done.

4.  Now to attach your other side.

Lay your second outer piece right side up.  Take your zip (with attached fabrics flipped over so that wrong sides are together), and lay the un-attached zip edge across the top of your second outer piece so that your 2 outer pieces are right side together (are you still with me?).

Your second lining piece is then laid on top across the zip as before - try to line up the top edges.  Pin and sew as before (you don't need to change anything about your zipper foot).  Backstitch at both ends to secure.


You might need to fiddle a little with the zip again but remember to keep your needle down!

Flip your fabrics over and you should now be all attached....you've done it.  You've sewn in a zip!  


5. Press the lining and outer fabric away from the zip and with your purse all laid out flat (each side has a lining and an outer),  topstitch on both sides along the side of the zip (you  can use your zipper foot for this bit too!)


Make sure your lining is gently pulled away from your zip when doing this to avoid it bunching up and getting in the way of your zip when you try to open it.

6.  Now, to sew it into a purse.  Open your zip at least half way - don't forget!!

Change back to your normal zigzag foot and flip over your fabric, so that your outer pieces lie right sides together and your lining pieces are right side together and your zip open in the middle. Pin; you will notice that your open zip teeth can lie towards either the outer or the lining - you get cleaner corners if you make them lay towards the lining!


Sew all around the 4 edges leaving a gap of a few inches in the bottom of the lining for turning.  Backstitch to secure at start and finish.

Clip the corners and trim the ends of the zip; turn through the gap in the lining and push the corners out.  Press, sew up the gap in your lining with matching colour thread.

There you have it...a cute little zipped purse.  Once you have got the hang of it, you can knock up quite a few little purses in an evening.  


Even better, you can start using zips in all sorts of things...very handy!


Fabric - Amy Butler, Lark Souvenir Lemon
Zips - Bright Button - zips in huge choice of colours and lengths, great prices too! 


Tuesday, 7 August 2012

My weekend

Mr L took a few much needed days off this weekend, so we took full advantage and squeezed in as much as possible - a rare cinema trip (just the two of us!), trips to the park, a lovely event and a visit to Peppa Pig's house.

On top of that, I ran up this fab little utility apron (Batman inspired perhaps?) It was super handy to keep everything close by for the weekend's event:


You can find the tutorial at Sugar Bee Crafts

Speaking of which, here are a few pictures from the Windsor Emporium on Sunday; this event is held the 1st Sunday of every month at the Guildhall and is well worth a visit just to see the amazing paintings if nothing else...


I picked up this lovely teapot from Blue Heart Ceramics....


and to round off our long weekend, a trip to Peppa Pig World.....

a very wet peppa pig world..


oh, also managed to squeeze in a little make for the home...


A very handy phone holder to keep all those annoying cables from trailing across worktops.

Pheww, think that's it!


Thursday, 19 July 2012

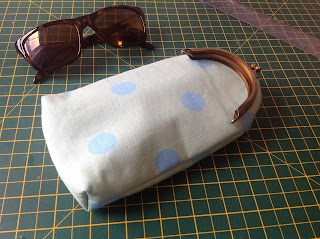
Sunglasses Case


At the Duck Pond Market this past weekend, I was asked to make a sunglasses case.  I have to admit that this has been on my To Do list for ages but I just haven't got around to it - so it was a good excuse to give it a go.


I used the guide by the fabulous Lisa Lam at U-handbag but this meant making my own pattern - eeek!  This is always risky for me.


Some cutting and a little bit of sewing later, we get to the exciting part:


Will it work when when all turned out...


Er...no actually. 

 It was a bit wide and looked a bit odd.  So off for a cup of tea and rethink and chop a couple of cm's off the width and start again with success..


It even fits my super big Jackie O' glasses.


Thursday, 12 July 2012

Daytrip to Whitstable


In a bid to out run the rain last weekend, we went for a daytrip down to Whitstable.  A quick stroll along the sea front, a very tasty lunch at The Pearson's Arms and a mooch around all the lovely little shops including the wonderful Mainwearing's Seaside Brocante, a vintage and antique fair held a couple of times a month (featured in July's Homes & Antiques).


We picked up some bargins - all those buttons for £1 (ONE POUND!!!) and a fab lemon squeezer.  You might think this a bit random but Mr L and I are having an obsession with whisky sours - so we snapped it up.  Our purchases also included some delicious cupcakes form What's Up Cupcake but these didn't make it long enough for a photo...mmm... 


We've been to Whitstable before when Little Miss L was tiny and I'm smitten despite our last trip ending in a terrible stomach bug and a return journey on the back of a recovery van due to some lost car keys.  If you still like a place after that, it must be love.

I am kicking myself though as I didn't take any pics so to make up for it, I thought I would share my new toy - Mr L very generously gave me an ipad after I gave him a presentation on how it would increase my productivity and I could be working smarter, it would be really good for business, blah, blah, blah.   So here's what I've been doing...


he he he.

Oh, I can hear him coming back, look busy


Thursday, 5 July 2012

A Little Makeover

Little Miss L's nursery has moved house and all the kids have been given a new little bag for all their spare clothes...only thing is, it's quite dull and they all look the same!


So, as Little Miss can't read just yet, I thought I'd better add something to help her recognise her bag and stop other people taking her stuff home (does anyone else have this problem??? It's sooo annoying especially when you take the time to write her name in everything.  Grrrr..)


I thought this would be a good chance to have a go at freehand machine embroidery but after my second flower going a bit haywire, I gave up.  This technique really puzzles me...I did the first flower- stitches all fine, a bit wobbly but thought by the last one, I'd have it down.  Move onto my second flower, same fabric, thread, etc. and it just goes crazy.  I can't work it out!  I've decided I must be a bit of a neat freak (...although the state of my home doesn't really support this) or it's something to do with the feeling of being a bit out of control - I've decided it's not for me.

I stitched the last flower and the butterfly using a normal small straight stitch and pivoting my felt every now and then.  It took a bit longer, but I much preferred the end result.  The darker flower is the freehand one - not sure you can see a huge difference but I felt much calmer doing it! 


I then just stitched them straight onto the jute bag with embroidery thread - not particularly neatly either but that's what happens when you're side tracked by Don Draper and Mad Men re-runs!


Oops, just noticed I've sewn the butterfly wings on back to front and it looks a bit like a moth.  Oh well, at least it will stop her stuff going home in the wrong bag.


Wednesday, 13 June 2012

Suitcase Make-over

A few weeks back on a trip to Liberty, I fell in love with a fabric covered suitcase - I even posted the link to it on facebook in the hope that Mr L would surprise me with a gift!  He did eventually see it but by that time I was onto Plan B....


I wanted the suitcase for my market table display so I followed ebay for just the right suitcase (at just the right price!) and eventually won this little beauty - it has a handle missing but as it's for my display, it's not important.

Although the Liberty suitcase had a beautiful fabric cover, I decided the leather was pretty enough to stay (besides, it's going to be open so covering it would be a waste of time!)....however, I needed to do a little work inside....


I cleaned it up....the worst bit.  Ripped out the inside, gave it a rub down and a wash and then the good bit...


And ta da.....


So it's not quite the beautiful Liberty print suitcase I was after, but I think it looks good and it was sooo much cheaper!  My lovely Plan B suitcase will have it's debut this Sunday at the Duck Pond Market in Ruislip!